Android開発日記 AndroidのBluetooth通信(SPP)【初心者向け】
今回はスマホ(Android)とPC間で、Bluetooth通信をやってみました。
Androidを使ったBluetooth通信の記事を調べると以下のサイトが出てくると思います。
https://www.bright-sys.co.jp/blog/android-using-bluetooth-spp/www.bright-sys.co.jp
これはGoogleが提供しているサンプルコード「BluetoothChat」を解説しているサイトなのですが、初心者からするととても分かりづらいです。
まずは、ボタンを押したら「HelloWorld!」って表示されるところから始めたいですよね・・
分かりやすい記事を調べるのですが、見つけることが出来ず苦労したので、これからAndroidでBluetooth通信を始めたいって方に役立つような内容にしました。
このBluetoothChatの中にある機能から必要最低限のメソッドだけを取り出したコードです。
(コードの全ては最後に記載してあります。)
まず、AndroidにはBluetooth用のクラスが既に用意されていますので、ソケット通信に必要な知識(Listenやbind、acceptなど)は恐らく必要ないです。
(知っているに越したことはないですが)
基本的にコード上で用意する順番として、
BluetoothAdapter
↓
BluetoothDevice
↓
BluetoothSocket
↓
OutPutStream
↓
ソケット通信を行う
といった流れです。
また、Bluetooth同士は既にペアリングしてあることが前提として行います。
(ペアリングに関しては他のサイトで調べてください。)
具体的に説明していきます。
まず、Bluetooth同士が通信を行うためには相手のデバイスの物理アドレスが必要になります。
サーバー側となるPC側は設定する必要はありませんが、(PC側の説明は後半にあります)スマホ側は相手(PC側のBluetoothアダプタの物理アドレス、以降、MacAddress)を指定してあげる必要があります。
MacAddressを調べるには以下の方法で行います。

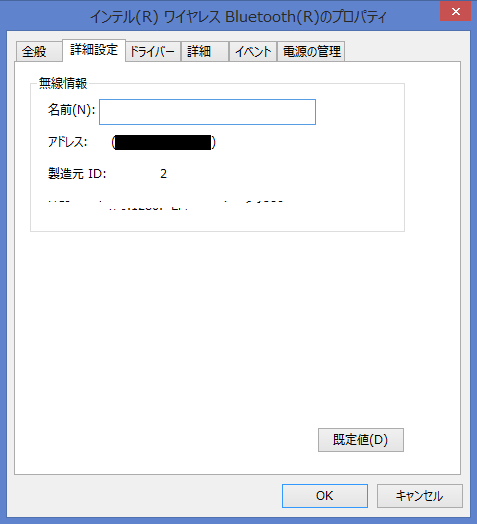
デバイスマネージャーを開いてBluetoothのプロパティを開きます。

図上で黒くなっている部分に書いてある数字がMacAddressです。(後で使用します)
このようにして確認できます。
これで準備は完了です。
コードを見ていきます。
    private BluetoothAdapter mBTAdapter = null;//Bluetooth通信を行うために必要な情報を格納する
    private BluetoothDevice mBTDevice = null;//実際に通信を行うデバイスの情報を格納する
    private BluetoothSocket mBTSocket = null;//ソケット情報を格納する
    private OutputStream mOutputStream = null;//出力ストリーム

    private Button btnSend;//送信用ボタン
    private Button btnFinish;//終了用ボタン
    private TextView textview;//MacAddress表示用
    private String MacAddress = "○○:○○:○○:○○:○○:○○";//アルファベットは全て大文字出ないとエラーになる
    private String MY_UUID = "00001101-0000-1000-8000-00805F9B34FB";//通信規格がSPPであることを示す数字
MainActivityクラス内のメンバーです。
MacAddressは先程調べたものをアルファベットは大文字で書いて下さい。
    @Override
    protected void onCreate(Bundle savedInstanceState) {
        super.onCreate(savedInstanceState);
        setContentView(R.layout.activity_main);

        btnSend = (Button)findViewById(R.id.btnSend);
        btnFinish = (Button)findViewById(R.id.btnFinish);
        textview = (TextView)findViewById(R.id.textView);
        btnSend.setOnClickListener(new View.OnClickListener() {
            @Override
            public void onClick(View v) {
                if(mBTSocket != null) {
                    Send();
                }
            }
        });
        btnFinish.setOnClickListener(new View.OnClickListener(){
            @Override
            public void onClick(View v) {
                finish();
            }
        });

        //ソケットを確立する関数
        BTConnect();

        //ソケットが取得出来たら、出力用ストリームを作成する
        if(mBTSocket != null){
            try{
                mOutputStream = mBTSocket.getOutputStream();
            }catch(IOException e){/*ignore*/}
        }else{
            btnSend.setText("mBTSocket == null !!");
        }
    }
onCreate関数内では、
btnSendボタンが押されたらSend関数を
btnFinishボタンが押されたらfinish関数を呼ぶ設定をしています。
(Send関数はオリジナル、finish関数はアプリを終了させる時に呼ぶ関数)
その後、ソケットを確立する関数BTConnect関数(オリジナル)を呼び、
ソケットが取得出来たら(確立したら)、「mBTSocket.getOutputStream();」によって、出力用ストリームを作成しています。
(出力ストリーム関連はJavaの知識ですね)
先に、BTConnect関数から見ていきます。
    private void BTConnect(){
        //BTアダプタのインスタンスを取得
        mBTAdapter = BluetoothAdapter.getDefaultAdapter();

        textview.setText(MacAddress);
        //相手先BTデバイスのインスタンスを取得
        mBTDevice = mBTAdapter.getRemoteDevice(MacAddress);
        //ソケットの設定
        try {
            mBTSocket = mBTDevice.createRfcommSocketToServiceRecord(UUID.fromString(MY_UUID));
        } catch (IOException e) {
            mBTSocket = null;
        }

        if(mBTSocket != null) {
            //接続開始
            try {
                mBTSocket.connect();
            } catch (IOException connectException) {
                try {
                    mBTSocket.close();
                    mBTSocket = null;
                } catch (IOException closeException) {
                    return;
                }
            }
        }
    }
「mBTAdapter = BluetoothAdapter.getDefaultAdapter();」によって、
スマホが持っているBluetoothAdapterのインスタンスを取得できます。
次に、
取得したアダプタのインスタンスから
「mBTDevice = mBTAdapter.getRemoteDevice(MacAddress);」によって、
指定した物理アドレスを持つデバイス(相手デバイス)のインスタンスを取得できます。
相手のデバイスを指定出来たら、今度は通信を行うソケットを用意します。
どんな通信規格でやり取りするかを指定する必要があるので、UUIDを設定します。
(UUIDに関しては調べてください。私もよくは分かっていないので)
「mBTSocket = mBTDevice.createRfcommSocketToServiceRecord(UUID.fromString(MY_UUID));」
これによって、指定した相手デバイスとのSPPで通信するためのソケットが用意され、mBTSocketにそのソケット情報が格納されます。
最後に、
「mBTSocket.connect();」
によって、実際に接続され通信が確立します。
この時、相手側がスタンバイ状態(accept)でなければ、接続が失敗となります。
AndroidのBluetooth通信でクライアント側の実装は、余計なものを省略するとこれだけで出来ます。
後は、Send関数内の処理は見た通りです。(Stream関連はjavaの知識(2回目))
    private void Send(){
        //文字列を送信する
        byte[] bytes = {};
        String str = "Hello World!";
        bytes = str.getBytes();
        try {
            //ここで送信
            mOutputStream.write(bytes);
        } catch (IOException e) {
            try{
                mBTSocket.close();
            }catch(IOException e1){/*ignore*/}
        }
    }
今回はサーバー側まで作ると大変でかつ、ややこしくなるのでサーバー側はTeraTermにお願いしています。
以降、PC側(TeraTerm側)の設定です。
SPP(Serial Port Profile) 通信ですので、シリアルポートを用意する必要があります。
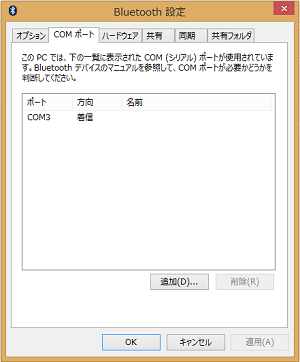
まず、Bluetoothの設定画面を開きます。
COMポートタブを開き、追加を選択します。
「着信(デバイスが接続を開始する)」を選択し、OKを押します。
図のようにポート番号と着信が表示されていればOKです。
(最初、ポート番号が表示されていないかもしれませんが再起動とかすれば表示されると思います。)

TeraTerm(TeraTermに関しては解説しませんので、ググって下さい)を用意して、
新しい接続
↓
シリアルのポート番号
↓
先程表示されたポート番号を設定
↓
準備完了です。
PC側の設定をざっくり言うと、
「シリアル通信用のポートを設定して、TeraTermでそのポートを指定して後は接続が来るまで待たせる」
となります。
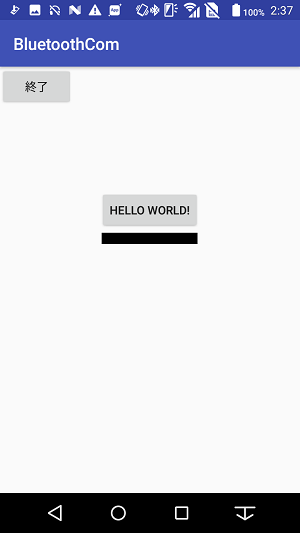
TeraTermを待機させた状態で、スマホ側のアプリを起動してみます。
起動してすぐに、

この状態だと何らかの理由で接続が失敗しています。

この状態であれば、接続成功です!!
(黒い線のとこにMacAddressが表示されます)
真ん中の「HELLO WORLD!」をクリックするとTeraTerm上で「Hello World!」と表示されたと思います。

こんな感じで
以上で、Bluetoothを使った通信の基礎的な説明は終わりです。
実際に実用的なものになるためには、以下のような実装が必要です。
・デバイスの周りにあるBluetoothの検索
・接続するデバイスのペアリング設定
・既にペアリング済みのデバイスの一覧表示
・connect関数やwrite関数、read関数の非同期処理
(AndroidはUI描画が行えるスレッドが一つしかないので、一定時間ブロッキング処理をUIスレッドで行うとシステムがインテントを投げます。)
・サーバー側の実装
何か気が遠くなりそうな作業量ですが、一つずつ実装していくしかないと思います。
サーバー側の実装はサーバーがスマホ(Android)かそれ以外かでまた変わると思います。
「BluetoothChat」で解説されているサーバーはスマホを使っています。
それ以外の場合だと、ガッツリ省略した通信に関する知識が必要になると思います。(Listenやbind、acceptなど)
ただ、今回の実装もそうでしたが、今はもう関数やクラスが用意されていることが多いです。(ゲーム用のDXライブラリとかも殆ど知識要らずに、IPを設定してあげるだけで、通信出来るようになりますもんね)
サーバー側の実装はUbuntu上のc言語で実装したことはありますが、windowsでは試してみましたがちょっと知識不足で出来なかったです(笑)
もし練習で行うのなら、Androidのサーバーを作るか、Linuxなど分かりやすいもので作ってみるといいと思います。
(windowsでも直接c言語を叩いてDOS画面でコンパイルしてあげれば、動くのかな??今度、調べてみよう)
Bluetoothは色んなデータを通信できるので、SPP通信以外にも通信出来るようになりたいと思っています。
まあ、リモコンみたいな使い方なら今の知識で十分ではありますが、使える幅が狭いですからね、、、映像や音声をBluetoothでやりとりしてみたいです。
MainActivity.java
package com.example.○○○.bluetoothcom;

import android.bluetooth.BluetoothAdapter;
import android.bluetooth.BluetoothDevice;
import android.bluetooth.BluetoothSocket;
import android.support.v7.app.AppCompatActivity;
import android.os.Bundle;
import android.view.View;
import android.widget.Button;
import android.widget.TextView;

import java.io.IOException;
import java.io.OutputStream;
import java.util.UUID;

public class MainActivity extends AppCompatActivity {

    private BluetoothAdapter mBTAdapter = null;
    private BluetoothDevice mBTDevice = null;
    private BluetoothSocket mBTSocket = null;
    private OutputStream mOutputStream = null;//出力ストリーム

    private Button btnSend;//送信用ボタン
    private Button btnFinish;//終了用ボタン
    private TextView textview;//MacAddress表示用
    private String MacAddress = "○○:○○:○○:○○:○○:○○";
    private String MY_UUID = "00001101-0000-1000-8000-00805F9B34FB";

    @Override
    protected void onCreate(Bundle savedInstanceState) {
        super.onCreate(savedInstanceState);
        setContentView(R.layout.activity_main);

        btnSend = (Button)findViewById(R.id.btnSend);
        btnFinish = (Button)findViewById(R.id.btnFinish);
        textview = (TextView)findViewById(R.id.textView);
        btnSend.setOnClickListener(new View.OnClickListener() {
            @Override
            public void onClick(View v) {
                if(mBTSocket != null) {
                    Send();
                }
            }
        });
        btnFinish.setOnClickListener(new View.OnClickListener(){
            @Override
            public void onClick(View v) {
                finish();
            }
        });

        //ソケットを確立する関数
        BTConnect();

        //ソケットが取得出来たら、出力用ストリームを作成する
        if(mBTSocket != null){
            try{
                mOutputStream = mBTSocket.getOutputStream();
            }catch(IOException e){/*ignore*/}
        }else{
            btnSend.setText("mBTSocket == null !!");
        }


    }

    private void BTConnect(){
        //BTアダプタのインスタンスを取得
        mBTAdapter = BluetoothAdapter.getDefaultAdapter();

        textview.setText(MacAddress);
        //相手先BTデバイスのインスタンスを取得
        mBTDevice = mBTAdapter.getRemoteDevice(MacAddress);
        //ソケットの設定
        try {
            mBTSocket = mBTDevice.createRfcommSocketToServiceRecord(UUID.fromString(MY_UUID));
        } catch (IOException e) {
            mBTSocket = null;
        }

        if(mBTSocket != null) {
            //接続開始
            mBTAdapter.cancelDiscovery();
            try {
                mBTSocket.connect();
            } catch (IOException connectException) {
                try {
                    mBTSocket.close();
                    mBTSocket = null;
                } catch (IOException closeException) {
                    return;
                }
            }
        }
    }

    private void Send(){
        //文字列を送信する
        byte[] bytes = {};
        String str = "Hello World!";
        bytes = str.getBytes();
        try {
            //ここで送信
            mOutputStream.write(bytes);
        } catch (IOException e) {
            try{
                mBTSocket.close();
            }catch(IOException e1){/*ignore*/}
        }
    }

    @Override
    protected void onDestroy(){
        super.onDestroy();
        if(mBTSocket != null){
            try {
                mBTSocket.connect();
            } catch (IOException connectException) {/*ignore*/}
            mBTSocket = null;
        }
    }
}
activity_main.xml
<?xml version="1.0" encoding="utf-8"?>
<LinearLayout xmlns:android="http://schemas.android.com/apk/res/android"
    xmlns:app="http://schemas.android.com/apk/res-auto"
    xmlns:tools="http://schemas.android.com/tools"
    android:layout_width="match_parent"
    android:layout_height="match_parent"
    android:orientation="vertical"
    tools:context="com.example.○○○.bluetoothcom.MainActivity">

    <Button
        android:id="@+id/btnFinish"
        android:layout_width="wrap_content"
        android:layout_height="wrap_content"
        android:text="終了" />

    <Button
        android:id="@+id/btnSend"
        android:layout_width="wrap_content"
        android:layout_height="wrap_content"
        android:layout_gravity="center_horizontal"
        android:layout_marginTop="100dp"
        android:text="Hello World!"/>

    <TextView
        android:id="@+id/textView"
        android:layout_width="wrap_content"
        android:layout_height="wrap_content"
        android:layout_gravity="center_horizontal"
        android:text="TextView"/>

</LinearLayout>